
Microsoft Windows 10 is easily one of the most popular operating systems the company has created in a long time. The decision to switch to SaaS and allowing the OS to receive frequent updates made it easier for users to adapt to it without having to worry about jumping to Windows 11 in the near future.
The security aspect continues to be a big question because people tend to be lax on security best-practices and there are dozens of apps that everyone uses on a daily basis. If you have been using a simple or reused password for your Windows 10 login, it could lead to a security breach. In order to avoid this, Microsoft now allows you to login to your account with Windows Hello or a Security Key.
This guide focuses on providing you step-by-step instructions on how to sign into your Microsoft account with Windows Hello or a Security Key.
Minimum Requirements to Use the Feature
- A PC or laptop that is running on Windows 10 version 1809 or later
- Microsoft Edge browser
- In order to make use of features like Face ID or fingerprint scanner, you need to have a web camera or a fingerprint scanner, which could vary based on the device you are using
How to Sign in Using Windows Hello
Windows Hello is a feature which has to be individually setup. It records your iris, facial features or a fingerprint based on the hardware available.
Once you have successfully set it up, you can open your Microsoft Edge browser and sign in when you provide the necessary verification.
A detailed guide for setting up Hello has been provided below for your convenience.
Guide to Help You Setup Windows Hello
A big difference exists between Windows Hello and Security Key. While the latter focuses on using USB or NFC provided by a service provider, Hello is a feature built into Windows 10. The advantage is that you don’t need to purchase any other products in order to make use of this feature.
Be it a webcam, fingerprint reader or an iris scanner, the one that is available on your desktop PC, laptop or Surface can be used to gain access to it instead of using a password that can be easily compromised.
- Click on the Windows key to open the Start Menu.
- Tap on the gear icon to open the Settings menu.
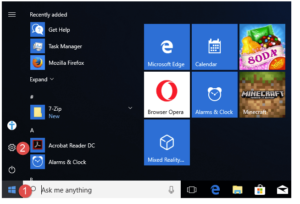
3. Open Accounts and head to the area that says Sign-in options.
 4. Choose Windows Hello and click on Setup.
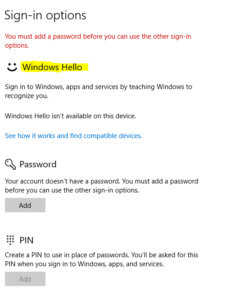
If your device is compatible, it will automatically proceed to the next steps, where you can create an easy way to sign in instead of using traditional passwords.
How to Sign in Using a Security Key
Similar to Windows Hello, it is important to setup a Security Key first.
- Head to the Microsoft account page.
- Make sure to keep your username/email ID and password handy in case you don’t remember it off the top of your head.
- Enter the credentials to log in to your account.
Step-By-Step Guide to Creating Your Security Key
- Tap on Security and continue to More Security Options.
- Find the option that says Windows Hello and Security Keys.
- Click on Setup a Security Key.
- Choose the type of security key you like to create as it would vary for individuals and corporate users, namely, USB or NFC keys.
- Just click on Next and you will be forwarded to the corresponding page.
- It is mandatory to enter your PIN or you should create a new one before heading to this page.
- If you have a fingerprint scanner, use it to scan your fingerprint or tap on the USB button.
- Add a name for your Security Key as you will mostly be using Windows 10 on multiple devices.
Configure Microsoft Edge Browser to Support Security Key
- Make sure you have signed out of your account after completing the initial setup.
- Open the Microsoft Edge browser and hit More Options.
- Choose the option Use Windows Hello or Security Key.
- Use your key, be it an NFC or USB, to gain access to your PC.
You can also manage your existing keys and logins in a password-less environment in the official Microsoft account page.
- Open the Microsoft account page (linked above).
- Login with your email and password.
- Click and open the Security tab.
- Open more security options and click on manage your sign-in methods.
If you are going to hand over your device to a different person, the sign-in options can be removed to ensure your details are not stored in a third party device. It will also make it easier for you to use your Microsoft account on your own authorized devices as well as your corporate computers without any issues that may occur due to same credentials used in multiple devices.
Choosing the Right Vendor for USB and NFC Security Key
Security keys are purchased from individual vendors for the purpose of added security because you will not be able to access a PC if the USB is not inserted in it. It provides layers of encrypted content, and some of them even have dedicated key management software making it easier to reset passwords or create additional keys as required.
Here are some tips:
- Choose a security key company that provides additional features and top-rated customer support. Microsoft lists its main partners as Yubico and Feitian Technologies.
- Head to the official website or check out the manual provided with your key to know more.
- The company’s customer care representatives should be able to help you create a fingerprint key or manage your existing key. You should also be able to check the company’s support/help pages for this information.
- A software-based interface is much easier as you will not be required to call customer care representatives or use chat support but rather will be able to do it all on your own.
Corporate device users should opt for a security key as it provides improved security for confidential data. Individual users can use Windows Hello which is more convenient, easier to setup and manage but it does require compatible devices with the components to use face-scanning or fingerprint sensor technology.